Thursday, October 25, 2012
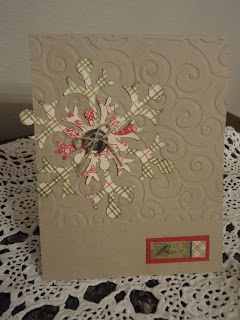
One sketch for two cards
I used punches and left over scrapbooking items for the fall cards and the new Snowflake sizzix die for the winter card.
Wednesday, October 24, 2012
Bell Jar svgs
 |
| Tall bell jar set |
 |
| short bell jar |
Short bell jar svg
Tall bell jar set svg
Tuesday, September 25, 2012
A Couple Joys of the Season cricut cards
 Today I have a couple cards to share done with Joys of the Season cricut cartridge. The first is the poinsettia, cut at 5 inch. The second is the flower from page 68 - I meant to cut the pinecone, but forgot the shift key. Once it was cut I figured I may as well make it into a card. I cut it at 5 inch initially, then did just the flower again at 4.75, 3.5 and 2.5 inch. For each flower I scrunched/curled the edges a bit-and glittered the edges. Did you know Christmas is only 2 months away?!!!
Thanks for looking!
Saturday, September 22, 2012
Fall burlap and felt coasters
I had this idea that burlap curtains in the craft area would be cute...it wasn't. So now I have a couple yards of burlap I need to use for something else. First use: coasters!
To make them you need:
 8- 5x5 inch pieces of burlap
4- 4x4 inch pieces of felt
4- felt cuts for top (sizzix dies cut felt GREAT! I used Tim Holtz tattered leaves die)
glue
sewing machine or embroidery thread/needle
NOTE: I do not know how to sew, so take this with a grain of salt.
Attach you cut felt to one burlap square- I used Aleenes glue to the edges of the cuts, NOT the center where I was going to sew ( I tried a couple other adhesives/hot glue but they didn't work as well, fabric glue would probably be good but mine had dried out)
 Sew or embroider some stitches on the felt to secure it to the burlap
Layer burlap with felt on top of felt and another burlap square. Zig zag or embroider around the edge of the felt square.
Pull the UN-stitched (is that a word?) burlap threads to fray the edges.
DONE!
Hummm, what do I do with the rest of the burlap now...maybe a Halloween banner or table runner or?
To make them you need:
 8- 5x5 inch pieces of burlap
4- 4x4 inch pieces of felt
4- felt cuts for top (sizzix dies cut felt GREAT! I used Tim Holtz tattered leaves die)
glue
sewing machine or embroidery thread/needle
NOTE: I do not know how to sew, so take this with a grain of salt.
Attach you cut felt to one burlap square- I used Aleenes glue to the edges of the cuts, NOT the center where I was going to sew ( I tried a couple other adhesives/hot glue but they didn't work as well, fabric glue would probably be good but mine had dried out)
 Sew or embroider some stitches on the felt to secure it to the burlap
Layer burlap with felt on top of felt and another burlap square. Zig zag or embroider around the edge of the felt square.
Pull the UN-stitched (is that a word?) burlap threads to fray the edges.
DONE!
Hummm, what do I do with the rest of the burlap now...maybe a Halloween banner or table runner or?
Friday, September 21, 2012
Cat on Broken fence silhouette card and svg
PSI_CatOnFence
Sunday, September 16, 2012
My first rag quilt done!
 |
| Close up of all my girly prints |
 |
| Finished size is 70 x70 |
Thursday, September 6, 2012
Fall Scarecrow Scrap page
Today's share is a quick 8x8 scrap page. Papers are from Mr.Campy (Cosmo Cricket), FALL font is Poplar Std. I wish the boys hadn't been holding their helmets but we had gone back out to ad the sign and decided we didn't feel like walking - yup, our driveway is really that long...see the end of the road in the photo, that's only the half way point. We made the scarecrow on their last day of Summer vacation using my old coveralls, Grandpa's old shirt, Andys hat and a dollar store bucket. We put outside vinyl on the bucket for eyes and a mouth. Andy stuck some straw under the vinyl mouth to make him look like he was chewin' on some straw... pretty cute addition I thought :)....... It was a fun project.
Subscribe to:
Posts (Atom)


