Thursday, December 31, 2009

A couple simple Thank you cards


Thank you cards from Christmas are now done. Here are a couple of the ones I did. The first is just an element from Season of Joy, cut at 3.75 inches. I put the pine cones on pop dots and then added some glitter. The second is a SCAL2 file cut from white and then I added a green insert for contrast.
SCAL2 Celtic knot notecard file:
HAPPY NEW YEAR!

Wednesday, December 30, 2009

Hello Snow Scrap Page


With all the holiday craft projects, I've had no time for scrapping, but today I sat down and did a page. The elements are from Stampin Up! My Design Studio (snowflake from Winter Post, label from Frames with a Flourish, and alpine ribbon), but I did it in PSE8. Thanks for looking!

Thursday, December 24, 2009

Tomorrow is Chirstmas, its practically here!


I made more of my Christmas gifts this year than ever before, and while its been a bit busy the past month, its been a lot of fun. So much so, that I'm already thinking of next years projects. There are a couple of threads going on the splitcoast forum that are strictly gift and craft show ideas. I've spent hours reading them and they are full of fun ideas that I've bookmarked for next year-but this time I'm starting earlier (I say that every year).

A few of my family read my blog so I haven't wanted to post, but today they will be here so I think its safe now. If you are family, please stop reading now, no peeking!

Now keep in mind that part of the fun, is that I kept each gift under $3 (not counting my stock items, like etching cream or essential oil) because my siblings and I are not supposed to exchange gifts.... but I figure if its under $3 it doesn't count.

Harley Davidson etched mug:


Etched Bath Salts Jar:

For this one I used the bath tub from Everyday Paper Dolls, and the font from Storybook (done in DS). The epsom salts are Eucalyptus mint (I had no idea these were so easy to make, this will be high on my make list for next year).


Vinyl Tile


Napkin Coasters:


Card Gift Set


This little purse was made with my score-pal, inside I have 6 handmade cards with 6 handmade (on my cricut, plantin, cut at 6 inch) matching envelopes.


The cards inside (2 bday, 2 TY, and 2 Thinking of you)


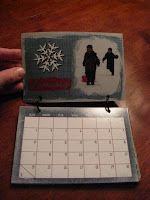
And my favorite was 4x6 pocket calenders. These are just digital calender/digital stamps (stampin up from My digital studio, scrapgirls, and shabbyprincess), that I had printed out as regular 4x6. I will definitely be doing this again, but this next year, I want to do it early. I bought a psd file with the layout and thought it would be easy/quick and was just supposed to be an add on type gift. Not so, it took many hours...but they were fun hours and I love the finished project. I won't post all 12 pages, yikes, but here is a sample. Oh, and the best part of this is that once your done, you can print out as many as you like!


Today I have 7 dinner guests coming, 2 spending the next 3 days at my house. 2 more coming tomorrow to stay here 2 days. Its going to be a house full, pretty crowded for my tiny house, but so much fun! Now I'm off to make some cookies for my guests. Have a wonderful Christmas Eve!


Sunday, December 20, 2009

Lighthouse vinyl tile


Here is another 6x6 tile I made. This one was made for my neighbors, they have lots of lighthouses in their home. The image was a freebie on http://www.clker.com/, I flipped it and cleaned up some of the small stuff. I did the writing in Photoshop so I could add a 5 pt stroke to scriptina (I can never get that one to cut well without fattening it up a bit). Then cut the whole thing from some white cricut vinyl. I couldn't get the seagulls to cut well, so I just did them by hand out of some of the scraps. I put a hanger on with Gorilla glue and added a felt piece to the back to finish it off. I think this would be a great one for a glass block, maybe I'll try that after the holidays. Thanks for looking!

Saturday, December 19, 2009

Chrismas cookies for the neighbors


I saw something similar to this last Christmas, someone selling boxes of mix with a cookie cutter and cute tag so people could make their own cookies (it was a craft fair item I think). I thought it was adorable and have been holding on to it all year. So that is what all my neighbors friends got this year (the ones with kids). I used holiday bags because I'm just too short on time to make anything, then I found a box of mix at costco that contained 6 individual bags of sugar cookies. For each one I wrapped a belly band of holiday patterned paper and a print out of the cooking instructions. I added 4 cookie cutters (box of 24 is $5.99 at Micheals), some sprinkles, three bags of homemade frosting (in sealed Wilton bags, so all they have to do is snip the end) and a tag (cut from my cricut).

Then I wrote this little poem to go with it:


We baked you some cookies,
It took us all day.
They looked really yummy
So I’m sorry to say,
we just had to sample,
we thought only one,
But we couldn’t stop…
and now you have none.
We could bake another
batch for you here,
but the same thing would happen
to those, I do fear.
If you’re ever to get them,
we think the best fix,
Is to just give you the icing,
the cutters and the mix.


It is a fairly quick and easy way to go, except for making the frosting. Turns out my Kitchen Aid mixer does not like a 4x batch of frosting. Do-able- but there was a lot of flying powdered sugar, I'd just do 2 batches at a time. For those who won't make the cookies within 2 weeks, you could also just put a can of purchased frosting.


Quick, simple, and under $5 per gift.

Thursday, December 17, 2009

Money, Check and Giftcards envelope svgs


7 days left to finish those craft projects! If instead your giving cash, checks or gift cards, then here are some freebies to help you make them look cute. The envelope is the right size for check or cash and is available in cut with Plantin Schoolbook/ds, or as SCUT for SCAL(2). To make the envie, fold in side tabs then glue bottom flap on edges only (where I have blue in photo3). If you want to just seal it, you can do that and decorate the front. I did a decoration plate the front then there is no sealing. To do that make your front plate, then add a couple pop dots just below where the top lip comes down, put the plate on and it will hold it close. This way it is re-sealable and even reusable.

Check envelope for Cricut DS,Plantin SB

For the gift card holder, it is SCAL only, sorry. But I do have some other gift card holders in DS here:


Wednesday, December 16, 2009

Yellow Snow


Taking a break from gifts to make a quick card for a friend. I find it funny, but I do have a sick sense of humor. The circles are 1 3/8, 1.25 and 1 inch. The scarf is cut at 5 inch and the hat is 4 inch (both from Winter Woodland). The dog is from Stampin Up. Hope I made you smile :) Be back in a bit for todays gift project.

Tuesday, December 15, 2009

The other tile: Mothers of little boys


This is the other tile I did today. It took me about 6 tries to get the letters all cut at the right pressure-I need different vinyl. I used the trace feature in SCAL2 today, WOW! That sure makes things a lot easier! So I did this at 5.4 by 5.4 inches and put it on 6 inch tile. I finished the sides with thin strips of the same vinyl and I still have to do the back with a hanger. The snow should be all gone by morning and I can get to Micheals for some glue and hangers...and spend my birthday money!


Hum, should I get a bind it all or A Childs Year?


Here is the file for the verse if you would like to make one:


9 Days left, Upsy Daisy tile wall hanging


This is my first tile for the wall. First I drilled two holes in my 46 cent 6x6 tile (which is very easy, so much easier than I thought that I quickly went through the tile and made a hole in hubbys work bench). Then I cut my vinyl, this image is Upsy Daisy from Stampin Up. The image is included in the new Digital studio software, so I just imported to inkscape, traced, then imported to SCAL. I cut it from brown vinyl and put it on the tile. The words are stamped (from Inspired by Nature, Stampin Up) and then I added a clear coat of acrylic. Then added a ribbon for hanging. There are eyelets around the ribbon, they are not "set" I just have the posts into the tile hole, the ribbon is so thick that they are tight enough without any glue. You can also hang tiles (so I've heard) with picture hangers and gorilla glue, but I don't have any yet (getting some today, because if you have a design on the top-like on the next one I'm doing, the holes get in the way). The spray changed the color of the letters so this will be my practice/to keep one and now I'm going to go do a couple others for actual gifts, and hopefully use a different ink.

FYI: Stampin Up has vinyl on sale this week.

Monday, December 14, 2009

10 Days left, glass etched mug


AHHHHH! I have only 10 days left to finish a mountain of gifts for family, friends and neighbors! The kids are only scheduled to have two days of school this week, and I have a feeling today will be delayed or canceled due to snow. No school next week, how I am going to get everything done????

Last night I tried glass etching for the first time for a gift for my nephew. It went ...OK...just OK. Fortunately I had bought 2 mugs, because I messed up the first one. The etching cream says 60 seconds, I did 15 minutes to be safe. WEll, that wasn't safe enough. The second time I just let it dry overnight, and it worked much better. If you want to try, you'll need a glass/plate/vase, some etching cream, and some vinyl (I used cheep vinyl book covers from the dollar store).

1. Cut your letter or shape (I used R in Old English font)
2. Weed out the part you want etched

3. Transfer to glass (I use clear contact paper for my transfer medium)


4. Cover with etching cream


5. Wait....wait....wait some more
6. Rinse - your done!

Tuesday, December 8, 2009

Snow Globe easel Card and free svg


This is a card I made for my sister. The snow globe I used is from Joys of the Season cut at 5 1/4 inches. I scored the paper (4.25 by 11 to start) at 5.5 and 9 inches. Then I put the inside verse on pop dots to give it an edge, this allows for the top of the card to stand up. The basic instructions for an easel card can be found HERE . To make the bottom of your snow globe look like wood, you can drag the edge of a brown ink pad across white, cream or tan paper. For the fake snow I used Styrofoam fluff (see this video for that technique). If you use SCAL and would like to try, I made a snow globe in inkscape and it can be downloaded below. To make it the same proportions as I used for the card, click the "keep proportions" box and size the height to 5.25 inches. Thanks for stopping by!

Sunday, December 6, 2009

Penguin cards and Free penguin SVG


I love penguins :) Here are a few cards I made. The brrrday and Joy ones are stamps (Stampin Up), the Top note one is stampin up punches and the Warm Wishes penguin I did in Inkscape. The SVG for that penguin is down below for todays "freebie". Have a great day!

Last years Christmas Scrap page


I love to do everyday type scrap pages but I have a hard time with holiday type ones. I think the choices are just too overwhelming! This is last years Christmas one, done before this Christmas so I guess for me that's pretty good. It is WAY busier than my normal pages, but I with so many photos to put on one page for the theme, it was inevitable and I've already spent way too much time on this...time to "let it be". The sketch is from this weeks challenge on SCS. Thanks for looking.

Friday, December 4, 2009

Hand Warmer Mittens matchbook for SCAL


Today's project is a little hand warmer gift. I was going to put the hand warms in a cellophane baggie then staple that in, but I can't find the little baggies anywhere (a common theme ever since I went from a craft room to a craft closet). So I stapled the hand warmers right in the, if you do that too, be sure to get only the edge of the packaging. If you get holes and then air in the actual pocket with the warmers, then they will activate and not work for the recipient. I used a ribbon to cover the staple and then the lip just slips under so they stay closed by themselves. I stamped the verse on after I put them together - hum, best to stamp before, lesson learned. The file is below if you'd like to make some, have a great day!
close up of assembly.

Come Let us Adore Him Title


Yesterday I spent a good deal of time making this title for my block, only to realized, duh, for vinyl they don't have to be one piece. So, I thought I'd post just the title I did in case someone can use it for another project. I'm hoping to go to Lowes today and get some tiles, maybe I can use it for that. This cuts much better from paper than the vinyl one in yesterdays post - for this one I did a stroke of 7 pixels to each letter-so they are not so delicate.

Happy cutting!

Tuesday, December 1, 2009

Christmas glass block with vinyl


Today I made my first glass block! My friend asked me to pick some up for her while I was in Oregon last weekend. I had not intended to buy any for myself, but pretty samples in the store and a 50% off sale (only $5 each!), changed my mind. Tonight I have bunco and we have a $5 gift exchange so I thought I'd make one for the gift. I used white stazon ink to to "frost" the glass, then red vinyl for the images. The images are from Christmas Cheer. I used DS to weld some hooks to the ornaments and cut out a snowflake from the large one. The blocks came with a big opening on the top, and I filled it with a stand of 50 white lights. It was my first time using my bowdabra so my tails ended up a little short, but the bow came out nice - hopefully it doesn't smooshed in the gift bag. I can't wait to make one now for myself!


Monday, November 30, 2009

Gingerbread House Ornament DS Update and SVG


Last year I did a gingerbread house ornament and lately I've received a slew of emails regarding the expired link. I had edited the file to add a page so it could be made with George or PlantinSB and didn't want to re-post until I had tested the files, which I finally did this morning. I also made an svg of the same file, in case you have SCAL. If you use SCAL, be sure to check the "keep proportions" box when you size, otherwise it wont all hook together neatly (I just learned that little lesson today). You can see the original post with instructions HERE

And you can now download the files here:

Saturday, November 28, 2009

A Wish for Peace Christmas card and dove svg


I just got back from spending the weekend at the in-laws for Thanksgiving. It was nice to see everyone, although a bit of a rough trip. Its about 6 hours each way and as anyone know who's traveled with children, 6 hrs is an eternity to a 6 year old (and I was traveling with 2 of them). I don't know how many times I heard "how much looonnngger". We got a flat tire on the way there, that was fun. Then we stopped for gas and the pump card thingy ate our card. The in laws have intermittent dial up internet - not good for an internet junky like myself. BUT, we did have a lovely time visiting and Carls parents watched the kids for us so we could shop in Portland for a while Friday without children. I did have my computer with me so while others slept, I played with inkscape and made a few files...enough to keep me busy testing and using the files this week. Here is the first one, a Christmas dove. Great for a card, or attach to a string for a tree ornament. I ran the wings through the cuttlebug and put the top one on with pop dots for added dimension. There is glitter on the tail and I used a brad for the eye. There is a very pretty dove on one of my Christmas carts but I really wanted one with a wing I could emboss, so this is it! File is below. Thanks for looking, hope everyone had a fun and safe holiday weekend!

Tuesday, November 24, 2009

Something for the Hostess - Cook-marks


Need a little something for the wonderful person who's going to cook you a turkey this week? How about some cookbook bookmarks? I made several sets, they are good little gifts to keep on hand, plus I wanted some for myself! I printed out the verses and each one is 2 7/8 inches by 8 inches (then folded to 4 inches). I did them on a PDF if anyone else wants to make some and save a bit of time. I used From My Kitchen elements cut at 1.5 inches, but of course you could just stamp on them too. For the inside I used 1 x 2 inch thin magnet strips to keep it closed on the page. The magnets you can buy in rolls or sheets anywhere- or you can hoard the little advertising magnets that people give you for your fridge and recycle them (I'm sure its not what they had in mind when they paid to advertise, but some sacrifices must be made in the name of crafts).

Thursday, November 19, 2009

Reindeer SVG and Background paper


Today I thought I'd try my hand at making swirls in inkscape. I did a couple and then decided they looked like antlers so I turned them into a reindeer. I then exported the bmp and turned it into digital scrapbook paper. The snowflakes are from an Obsidian Dawn vector brush set. The Reindeer is todays freebie svg, and if your a digital scrapper, you can find the paper below too. Thanks for looking!

PSI_reindeer1.svg

12x12 digital reindeer paper

Monday, November 16, 2009

Thankful for scrappage and border svg


Paper and ribbon is Stampin Up, old olive brocade and chocoalte chip. The word mesh is 3.5 by 12, if you would like the svg for scal, it is below for todays freebie! Thanks for looking.
ThankfulMesh SVG

Friday, November 13, 2009

Altered Clipboard Winter Break Countdown


This is totally out of order, I still have Thanksgiving projects to finish, but I thought I'd post this anyway before I pack it away. I made two of these, one for each Kindergarten teacher. I started with a $0.97 clipboard from Walmart and painted the top part with blue, bottom with white. I stamped small snowflakes in white craft ink on the blue (can't really see them in the photo, but they are there) and I sprinkled glitter on the white while it was still wet to make the snow sparkly. The penguin is from Christmas Cheer, cut at 5 inches and the Winter Break is from Designers Calender at 4.5 inches. I just printed out the numbers with MS Word (200 pt for the numbers and 65 pt for words). I am going to make one for home for countdown to Christmas, but I think I better finish up my Thanksgiving projects first. Thanks for looking!