Wednesday, December 31, 2008

2008 Family Memories book, Cricut DS


I'm taking a couple hours to go scrap with a friend tomorrow so I thought I'd put together a mini book for 2008. This was made using Plantin Schoolbook and Cricut DS, final size is 6 by 11. The "family" and corners on the front are Home Accents (not included in file), and the Memories is a rub on. The pages are done using shadow letters and the final page of the file has the letters for layering, but they could easily be left off. I don't have a BIA (yet) so I used a 12 x 6 inch paper, folded over for my base, then put in some jumbo eyelets to keep it all together and scored the pages so they would all open nicely. I will post the inside photos hopefully tomorrow after my scrap time. The paper is double sided designer paper I got recently at Costco - 300 pages for $30! Such a great deal and I happen to be there on my birthday, so of course I had to buy it!
If you would like to make one, I've attached the file below. Happy New Year!

Sunday, December 28, 2008

Ric Rac for SCAL

There was a request for ric rac on my SCAL group. I don't have a photo of this cut, but I have used it and it cuts just great, it is 12 inch and close to actual ric rac, but you can of course resize, or cut it down. It was made using inscape and pse6. I will try and find something I can photo to show the cut, but here is the file in the meantime:

RicRac.scut

If you are a Cricut DS person, there is a similar file on my borders .cut from earlier post:
http://www.paperscissorsinc.com/2008/05/cricut-borders-and-decorative-scissors.html

Friday, December 26, 2008

Snow Ice Cream SCSB170


My stamp room is clean! Christmas cards and projects done, cleaned up, given away. Ahhh, now I can relax and make another mess, maybe get caught up on some scrapping. This was todays scrap page layout challenge on splitcoast. All supplies are from Scrap Girls.

Monday, December 22, 2008

Stamping on Tiles - fridge magnets

I'm snowed in so any last minute shopping for Christmas is completely out of the question. Fortunately I had just stocked up on magnet sheets and tiles. I didn't have much experience with stamping on tiles so I decided to read the splitcoast threads on the best technique. Two hours of reading later all I learned was that everybody has their own best way to do it. I decided to sacrifice a few tiles and try several different inks, sealers, chalks, heat set vs. non heat set, etc. to see what worked best for me. I had started with 3 different tiles, smooth 2x2, medium grit 2x2, and standard 4x4 tumbled tiles. 2x2 tiles are sold at Lowes, you get 36 for about $4. Without a doubt, staz-on ink won out and with staz-on and sharpies, I did not need to heat set or use sealer. If you use chalk you get a nice watercolor look but then you MUST use a sealer, and on the smooth tiles, you need several layers of sealer which was simply too much work for me. So here's what I ended up with. The first was a set of 4 smooth tiles, done with staz-on and sharpies, one for each season.

The second was a medium rough 2x2 just stamped with staz-on. I've cut magnet sheet to go on the back and then made little 3x3 boxes to give them in (.cut file for box can be found about 5 posts back).


Two things I found really useful that I want to pass on, 1: nail polish remover will take off the staz-on and sharpies if you stamp in error. 2: Regardless of the tile texture, a light sanding and cleaning will dramatically improve the way the ink sticks.

Wednesday, December 17, 2008

Hot Cocoa pocket mug for Cricut, George or Plantin


I know I've seen these on the internet before, but of course when I needed one, I couldn't find one... so I made my own! If you are looking for one too, feel free to click the link below and use mine I have used cricut ds and created the file with two pages, one is George only and one is Plantin only. Your bug will only ask you for the carts needed for the cut so you can just highlight and cut from the page titled with the cart you do have, ignore or delete the other page. I figure everybody has either George or Plantin - or if your bug crazy like me, you have both! I have included tabs on the side and bottom of the mug that you fold and fold to the back. When I made the mug big enough to accommodate the hot cocoa packet and tried gluing it closed along the bottom and side, then it didn't fit in a standard card envelope, with the tabs, the cocoa packet fits nicely in the mug and will still fit in the A2 envelope. This one I sponged, stamped and tied a bow, super quick and great for tossing on the top of a package or handing out as gifts.

 Mug cut file
 

Thursday, December 11, 2008

Creating your own silhouette svg with PSE, SCAL


I've seeing all the beautiful silhouettes people are using and thought it would be fun to make some cards with my own images. I'm sending this one to my MIL . It was taken last week when my boys and my DH were decorating the tree. I used PSE6, Inkscape and then SCAL. If you'd like to do some of your own photos, here's what I did:

1. Open your photo in PSE - something with bold images will work best


2. Use the quick selection tool, lasso or pen to pick your object


3. Control+J to put the selection on its own layer


4. Set your foreground color to black and lock the transparency (or the whole thing will turn black)

5. Fill layer with black, unlock transpart pixs and fill with white


6. Save as JPG


7. Import into Inkscape and trace bitmap, do any cleaning up with nodes and save as an SVG


8. Import SVG into SCAL


Here is my second one, I think I will use it on a scrap page.

Halloween 08 Scrappage


Here are my boys all dressed for Halloween. They had so much fun that they are already talking about what they want to dress up as next year. The photos were framed and edited in PSE6, then I used SU paper (Pumpkin Pie and Black) for the base, SU rub-ons (Bats) and Su Stamps (Batty for You stamp set), Eeek is just written in white gel pen and I streaked the edges of the photos with black Staz-on ink. Thanks for looking!

Wednesday, December 10, 2008

Next years scrapbook challege

Time and time again we are told that studies show that if you write your goals down, you are more likely to achieve them. I think for me its because I forget them, heck, if I write them down, there is even a good change I forget WHERE I wrote them down. I'm looking through photos taken over the past month and realizing how far behind I am in scrapbooking. I look back at photos just taken a few months ago and already have trouble with the journaling. Looking at photos taken of my boys as babies just a few years ago, I can barely remember which is which (I know, bad mommy, but cut me some slack, they are very identical). Looking at photos taken as a child, I barely remember anything. If I don't scrap them now, how will I tell the stories later? I doubt my memory will get better with age. SO, I'm writing down my goal for all to see, but mostly just for me -I don't think I'll forget where my blog it.
Next year, I'm going to do at least one scrap page per week. I usually do one a month, so this will be a big jump for me. I am a hybrid scrapper (if you don't know what that is...it is someone who mixes both traditional and digital scrapping) and wanting to get better with my PSE and CS3 software so my goal also includes to try at least one new technique each month too, shouldn't be too hard because there is just so much you can do with digital scrapping/photo editing and so little I've tried so far. I am hoping I will have some others who will want to join me in this quest. I also know that tomorrow never gets here, so I'm starting today, then I will have a couple weeks jump on things. If you can relate this all too well, I hope you will join me. If you are doing traditional scrapping, maybe you can use my layouts or cricut .cut files for embellishments, if your digital or hybrid maybe you can join me in trying some new techniques, or suggest some you really like. 52 scrap pages? 26 new techniques? I do love a challenge!

Sunday, December 7, 2008

Thinking Snow! Cricut DS Swirl Tree


I needed a bare swirly tree for a scrap page (my boys were climbing a bare windy willow tree last week) . This was my test cut, and not liking to throw things away, I thought I'd use it for a card. The snowflakes are stamped on kraft with white pigment ink, snow on the tree is a little flocking-fun stuff! I put the second paper/snow on pop dots for dimension. To make this I had to use 3 different carts to get the swirls to mesh in a nice way, Joys of the season, Home Accents and George(the trunk is an I). Tree height is about 4 inches. As I made this card I am thinking and wishing for snow. I used to hate the snow, but now with two little boys, I find myself wishing for it to get here. My boys will have lots of fun and I will get lots of cute pictures, forecast is for a chance of snow next weekend. I hope they are right! I'll try and finish that scrap page and get it up too.

PSI_SwirlTree.Cut

Thursday, December 4, 2008

Library Card style tags/gift holder


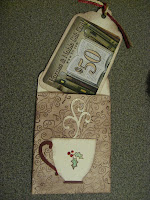
I was shopping and saw a sizzix die for library card type holders, it was cute and I thought it would be perfect for some of the Starbucks cards I bought, not to mention journaling tags, gift tags, and all around cute tags! I didn't buy the die, I made a similar one instead for the cricut (I think there is one on Fab Finds cart, but I don't have that one, this is George). I have three sizes on the file, one is perfect for gift cards, one is general journaling size, and one is perfect for Christmas tags (about 1.25 inches wide). For my coffee card holder I used a background wheel from Stampin Up! (Illuminated) and sponged on close to cocoa ink. The Cup/steam is from Joys of the season, I have included it in the file just because I don't want to have to resize it each time I make this (and I know I will make several) but if your using it for something else or don't have that cart, you can easily remove it. FYI, Dazzling diamonds on the steam looks really cool in person (I also put it on the holly, and used stickles for the berries-sparkle, sparkle, sparkle!) You'll notice that I had to use a Barnes and Noble gift card for size. Well, this is because I bought some Starbucks cards at Costco (5 $20 cards for $80, yeah!), but hubby and I have managed to use 4 of them, oops. To ensure that I would have at least one left to give away, I put it somewhere safe....so safe I now have no idea where it is. Dang, I hate it when I do that! I guess I'll have to go to Costco and buy another pack so I can actually give some away- I'm sure the missing one will show up AFTER Christmas, oh well, it won't go to waste :)

If you are a SCAL user, I've made a similare one for you too, it is sized for gift card, but of course can be sized for whatever you like. It was made in PSE6 as I have completely given up any hope of learning to draw in inkscape.
PSI Library Cut file:

Christmas Cards

Everybody working on their Christmas cards? That's what I've been doing all week. I seem to have a hard time deciding on a color....then a hard time deciding on a layout. The best way to do things would be to pick one and make a whole bunch of that one design, but every year it seems like I make so many different samples, that by the time I find one I'd like to make in mass, I've got enough test cards to send out and be done. Good thing this year, because I've just about used up all my red, purple and white paper. I'm mostly using Snow Swirled Stamp set by Stampin' Up! , It is so elegant and I love that it has the verses included. Even for my cuttlebug cards, I'm using the Snow Swirled verses. So here are a few samples.


Splitcoast challenge cards(poinsettia is Cricut)


Moms Cuttlebug cards


I will finish these up hopefully today and then I have a little cricut cut to share for gift cards, check back later for that one :)