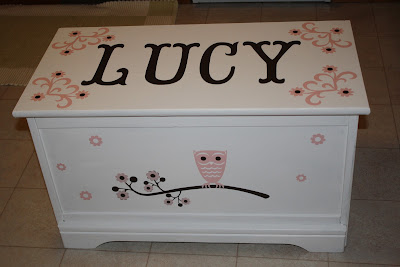
 A few years ago I bought a toybox at a garage sale. It had a bad green paint job but I liked the shape and size and just knew someday I would need it. My good friends sister just had a little girl and we decided it was time to fix up that box and make it super cute. We started by painting it white, then came the vinyl! I used Storybook font for her name at 8 inches in brown vinyl, then did corner flourishes at 6 inches (also storybook). Next we did a branch (Straight from the nest, 4.75 inch) and an owl (Storybook, 4.75 inch) for the front. For the sides we did the deer and squirrel from Cindy Loo (both at 7 inch). I vinyl I used was cricut brown, quickcutz baby pink, and stampin up pretty in pink (on the deer). I wish I could find the original photo of the box before painting, its an amazing difference. I soooo hope Lucy's mommy likes it.
 Tuesday, December 28, 2010
A toybox for Lucy
 A few years ago I bought a toybox at a garage sale. It had a bad green paint job but I liked the shape and size and just knew someday I would need it. My good friends sister just had a little girl and we decided it was time to fix up that box and make it super cute. We started by painting it white, then came the vinyl! I used Storybook font for her name at 8 inches in brown vinyl, then did corner flourishes at 6 inches (also storybook). Next we did a branch (Straight from the nest, 4.75 inch) and an owl (Storybook, 4.75 inch) for the front. For the sides we did the deer and squirrel from Cindy Loo (both at 7 inch). I vinyl I used was cricut brown, quickcutz baby pink, and stampin up pretty in pink (on the deer). I wish I could find the original photo of the box before painting, its an amazing difference. I soooo hope Lucy's mommy likes it.
Labels:
Cindy Loo,
Cricut creations,
decor,
Storybook,
Straight from the Nest,
Vinyl
Thursday, December 16, 2010
Tuesday, December 7, 2010
Christmas Cheer Stockings for dinner silverware...and more cards
table stockings DS file
And here are a few "quickie" cards....there is glitter on all the little rooftops, even though you can't see it from the photo, and the poinsettia is from Season of Joy, cut at 2 1/4.
Saturday, December 4, 2010
Several Cards and a dove svg

Of all the cards....my least favorite to make is Christmas cards (ok, maybe next to simpathy cards). I don't like doing them because there is just too much other stuff to do. Now if I could make them throughout the year they would be fun to make but...well that would just be too organized. Here are 4 styles I made over the past 2 day. Two are done with SU stamps (the Christmas collage stamps are part of a digital set you can buy for $5), the candy cane card is from Christmas cheer, words at 1.25 and candy at 4. The dove was done in inkscape/SCAL and I'm attaching that file below. Thanks for looking!
Dove SVG
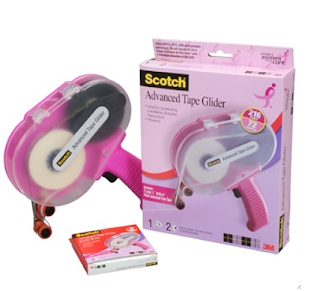
On a side note, Joy over at Obsessed with Scrapbooking is giving away two pink atg guns, hop over and enter for a chance to win!
On a side note, Joy over at Obsessed with Scrapbooking is giving away two pink atg guns, hop over and enter for a chance to win!
Monday, November 29, 2010
Snowflake card and 7th birthday scrap page
This snowflake is from Christmas Solutions cartridge cut at 3 3/4 inch. I did the shadow of each layer in dark blue and the top layer in white. The white was run through the xyron and covered in dazzling diamonds. The top snowflakes were put on with pop dots.
Next is this weeks scrap page, it is from my boys 7th birthday, all supplies are Stampin UP, the banner is from their stamp set Party Hearty, the rest was a scrap kit that came with their Digital Studio set.
Sunday, November 28, 2010
Paper Pinecone Ornaments for your tree
My friend showed me how to make these last year and I just love them. They are nice and lightweight and have that great paper feel (paper lovers will know what I mean). I had two on my tree last year, but this year I thought I would make a few more so I could just put them out in a bowl. They also make a lovely gift! Here's how you make them....
Supplies: Styrofoam eggs (the bigger kind work best, like 3 inch) One sheet of 12x12 paper or even better, some wrapping paper
a LOT of pins (you can buy a big container at the dollar store, does several)
ribbon
Start by cutting your paper into 1 x 2 inch strips and then folding over two corners to make a point. Make a big pile of these.
Next put 4 of your folded papers on, with points to the point of the egg, pin as close to the end of the point as you can.
Now start layering, pining each piece at the back two corners.
If you are going to hang this, then stop about 3/4 of the way up and pin in a loop of ribbon, put pins at the base of ribbon and more at the top of egg to and keep it in place.
Pin more papers until you get to the top of egg. On the smaller (2 1/2 inch) eggs I had to modify the papers a bit at the very top (use 1x1s instead of 1 x 2's or just fold over overlapping)
Thursday, November 18, 2010
Three trees Christmas card and svg
Heres a quick card and svg for you today, three simple trees. File also has a little patch of snow to put the trees on. File down below for at least one week.
link expired
On a side note....this weeks scrap page....
link expired
On a side note....this weeks scrap page....
Labels:
Cards,
Christmas,
Digital Scrapping,
SCAL,
Scrapbook Pages
Saturday, November 13, 2010
Todays Winter cards
There is snow in our forecast! Time for some snow cards...The first was done with Christmas cheer (snowman at 3.5 inch), and the second I used a snowflake from Christmas solutions cart. I ran the snowflake through the xyron and covered it in fine glitter - its really sparkly in person. The borders were done with punches (stampin up scallop and Martha Stuart snowflake). My enabler friend (you know who you are!) alerted me to these boxes of cards at Micheals. You 50 bases and 50 envelopes per box, with 50% coupon for $5. I like layers and will cut some of them up so I will only get about 25 cards out of it, but then the layers all coordinate and I'm left with an extra 25 envelopes. What a great deal! I bought 2 boxes, one winter and one Christmas, and I'm sure I will be getting some others. Check it out next time your there with a spare coupon!
Thursday, November 11, 2010
Thanksgivng cards with Doodlecharms, staight from the nest, joys of the season
I have been a card makin' machine today! Here are some of the cards I've made. I used the same basic style so that I could print out the verses and just embellish. The first was done with the filigree background on Straight from the nest (cut at 4 inch), I spritzed it with homemade gold glitter mist, then tied on a fake leaf with some linen thread. The second was done with Joys of the Season wreath at 4 inch and the fancy to p wreath is from Lacy Labels (Home, 4 inch). I could only get that to cut at 4 inch, any smaller and it tore and I wasn't crazy about how big it was on the card, so I only made of few of those. The last ones were done with the Joys of the season wreath at 3 1/4 and then doodlecharms leaves (1 inch) and Straight from the nest maple leaves (3inch). If you would like the card base I used, I'm attaching it as a PDF-hopefully that works. It will print two fronts and two insides per sheet of paper, trim each piece to 4 x 5 1/4, and mount on a standard A2 base.
 link expired
Saturday, November 6, 2010
Turkey silhouette svg and card
Just a quick card share today and a free turkey silhouette svg. I cut it from cream, then layered the cream on a darker color to show through. SVG will be avaible down below for one week.
link expired
link expired
Friday, November 5, 2010
Cupcake gift card holder and envelope svg
I got an email asking about a file I hadn't looked at in a while. You can see the original one HERE done with George and DS . This one is availible as an svg for one week on the link below. To create the look of the wrapper I just used single strokes of a marker, the ribbon holds the gift card in place, envelope is inlcuded in the file.
Thanks for looking!
link expired
Saturday, October 30, 2010
Autumn Blessings wood block and pumpkin svg
Today I'm making wood blocks with vinyl on them. I started with an 8ft piece from lowes (about $3), had my brother cut it into 10 inch pieces, painted it with acrylic, then sanded/distressed it, then added vinyl and some raffia. The font is Segoe Script and the pumpkin I drew in inkscape. I'm attaching it below as today's freebie, it actually has two pumpkins, a layered and the cut out style. Thanks for looking
link expired
link expired
Friday, October 29, 2010
And a couple more tiles done with my cricut
Labels:
Gift Ideas,
Lacy Labels,
Straight from the Nest,
Tiles
Wednesday, October 27, 2010
Design Studio search - I learned something new today!
So many times I'll do a search for an image, but then when I click on the cart I can't tell which button it is (partly because they show so stinkin' small on screen). Today when I was searching I accidentally clicked the arrow button right next to the word Keywords, and do you know what happens.....the key with that item gets highlighted, WOW! Its probably been able to do that all along and I just didn't know, or maybe its an update, either way....WOO HOO! I know you can also search on CricutSearch.com, but this way works for me-even better now. Just had to share...in case someone else out there didn't know either.
Tuesday, October 26, 2010
Give Thanks and BELIEVE gift tiles
Todays tile was Thanksgiving themed. The font is Champignon and is just beautiful, you can download it from on dafont.com. The wheat I drew in inkscape. I also have a Christmas one I did yesterday, the font is from Winter Wonderland and the sleigh is from Christmas. These are both 6x6 tiles. I see on another tile that someone asked how to drill the holes. There is a special bit you buy for your drill for ceramic tiles-I bought mine at Lowes for $10ish, just snap it into your drill and away you go!
Labels:
Christmas,
Cricut creations,
Fall,
Gift Ideas,
SCAL,
Tiles
Monday, October 25, 2010
Stocking Feet Only Please holiday tile
Here is my Sunday tile (I'm making a different one each day). Its done with Christmas Cheer (stocking, card function, with the fold marks hidden in DS), and Storybook. We used red sticky strip and diamond dust around the outside. This was made for my friend to remind her holiday guests not to wear shoes in her house, but I think we will make more of the same one (one for me too!) as soon as I get some more red vinyl. I love that you can use the actual card function to make a matching gift card, how cute is that! Thanks for looking!
Saturday, October 23, 2010
A couple Christmas tiles with Winter Wonderland, Noel, and SCAL
Here are a couple Christmas tiles I made - they are just the beginning so if you t are wanting to make some for gifts, stay tuned. The first one was done with SCAL for the words and the mistletoe is from the Christmas solutions cartridge (cut at 2 1/4 inch). The second one was done with the wreath from Christmas (Blackout, 4 inch), the berries (4 inch, layers, shift sleigh), and the joy (2 inch) are from Winter Wonderland. The tile is 6x6 and I drilled a hole before adding the vinyl so the ribbon could be used to hang it. Thanks for looking!
Labels:
Christmas,
Gift Ideas,
Tiles,
Vinyl,
Winter Wonderland
Sunday, October 17, 2010
Autumn Blessings storm door vinyl
I've had a vinyl bird (seen HERE) on my front door for almost 2 years and I was growing tired of it, so today I decided to put something more seasonal on. The Autumn and the pumpkin were done in inkscape, the blessings was just a standard font. I'm thinking this will look great on a block, so maybe if I get time tomorrow I'll give that a try. Thanks for looking!
Subscribe to:
Comments (Atom)


